Sorry we haven't posted in over a week...what a crazy week it has been! Today I am trying to play catch-up with my house and get things cleaned up from the weekend, and I was feeling quite overwhelmed this morning. Just making a mental list of all the things that needed to be done made me want to go back to bed. Then I was reminded by my husband to start with something small. He said that as I got small things done then I would be able to see my progress, which would build my confidence and make me more motivated to keep going. (I then asked him if he'd been reading my blog!) What a great reminder! So then I reminded myself that whether it's catching up from the weekend, re-doing a room, working on a big project for work or planning a big event, when you have a large and overwhelming task to complete, break it up into smaller parts. (Or in the words of a song from my son's favorite TV show, "If a word's too big to build, just break it down and you'll be thrilled. You can handle it bit by bit!") So, here's the moral of today's story: Break it down and handle it bit by bit! Big projects don't have to be overwhelming, just take it one small part at a time!
Thanks for the inspiration honey!
Monday, September 13, 2010


Friday, September 3, 2010
Use it or Lose it!
Ok, here's my organizing tip for the day. This is more of a de-cluttering tip. We've all heard that we should get rid of anything that we don't use in a year's time, but sometimes it can be hard to "prove" to ourselves that we really don't use some things. (This especially goes for clothes and shoes!) Well yesterday I read a tip somewhere that has to do with clothing that I thought was absolutely brilliant. Here's what you do. Once a year (could be January, or it could be today), turn all of the hangers in your closet around backwards. As you wear an item, re-hang it with the hanger turned the correct way. At the end of a year's time, anything that you haven't worn will still be backwards. That way you can quickly identify and remove items that you truly don't use. And just think...the more clothes you get rid of that you don't wear, the neater and more spacious your closet will feel!
Monday, August 30, 2010
So Much to Store, So Little Space!
This seems to be a common problem among...well...everyone. I don't think I've ever heard anyone say, "I just have too much space and not enough stuff to fill it up." (If you know someone like that, please have them share their secrets with me!) One of my biggest challenges is keeping my craft stuff organized. I loooooove crafts of all kinds. I have scrapbooking stuff, card-making stuff, Cricut accessories, kid-friendly items, and photos galore! After a year or so of moving and moving again and not really having a place for my crafts to call home, I have finally gotten everything organized and in place. (My motto, afterall, is "A place for everything.") Here are some "tools" that I find indispensable when it comes to getting project areas organized:
 |
| Drawers work great for my Cricut Cartidges, glue, stamps, and large accessories |
 |
| Boxes for kids' crafts, plus mail organizers for paper |
 |
| My scrapbooking bag, which now mainly holds paper! |
 |
| Boxes for photos and small bins for scissors, markers and pens |
Sunday, August 29, 2010
Cricut Card-making!
This past week we celebrated two birthdays, and my son looooves to help me make birthday cards on our "cutter" (i.e. the Cricut). This first one is the card we made for my Dad.

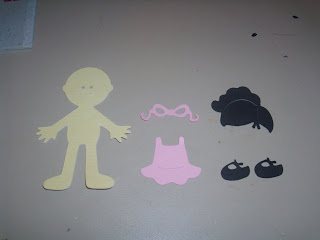


My little helper picked out the paper and the dinosaur, and he helped me glue it all together. We used the "Stretch Your Imagination" cartridge, which has some super cute designs, and a built-in function for card-making. We used the striped paper for the card foundation, then we used brown paper and green frames for the front. Then we used the "Paper Dolls Dress-up "cartridge to cut out the dinosaur. We had so much fun making it that we decided to make one for my brother's girlfriend too! We made hers with the Paper Dolls Dress-up cartridge as well, but we actually made a little character for this card. Here's how they start:

Then we glue it all together, enhance the features a little, and here's how it turns out:

Then we cut out the card base and an envelope using the Plantin School Book cartridge, glued it all together, and look how cute it turned out!


Friday, August 27, 2010
Kitchen Tips Courtesy of Martha
So, I love Martha. I am somewhat envious of her talent to decorate and organize. There is a great video of her on the Today Show (heart) sharing some tips for a beautiful and functional kitchen. I love when life is simplified.
Monday, August 23, 2010
Leaf Collages
The weather here was absolutely beautiful today, so we decided to go outside for a picnic, then ended up collecting a bag full of leaves! And what do we do with bags full of leaves? Make collages of course!! Today we decided to make "trees" from construction paper and our leaves. Here's what we used:

First, we cut "trunks" out of brown construction paper and glued them onto some thicker paper. then we separated and grouped the leaves, and we used scissors to cut some of them off of their stems.


I let my little artist decorate his yellow paper, then we put down some glue and he started going to town with the leaves! (If you cut off all of the stem it will stick to the paper better!) I think they turned out pretty cute. I love the variety of leaves we were able to find in our yard. I can't wait to see what kinds of projects we can get into this fall!!


First, we cut "trunks" out of brown construction paper and glued them onto some thicker paper. then we separated and grouped the leaves, and we used scissors to cut some of them off of their stems.


I let my little artist decorate his yellow paper, then we put down some glue and he started going to town with the leaves! (If you cut off all of the stem it will stick to the paper better!) I think they turned out pretty cute. I love the variety of leaves we were able to find in our yard. I can't wait to see what kinds of projects we can get into this fall!!

Thursday, August 19, 2010
Some Things I Love
Over the last couple of days I have been thinking a lot about children's crafts and art projects, mostly because we have been a little bit bored! My son loves doing art projects, and here are a few products that we love to use!


ColorWonder Finger paint! Clear finger paint that shows up only on the ColorWonder paper. I know the ColorWonder stuff can be a little pricey, but I looooove that it's clear and doesn't make a huge mess! As you can see, the results are beautiful! :)


These cool markers for beginning artists. They fit just right in a small hand, and when they're done coloring the marker sets itself upright and none of the color leaks out.
Crayola.com is an awesome website. It of course showcases all of their products, but it has some pretty awesome activities, coloring pages, and craft ideas. Check it out!
OK. So it seems like I'm a little obsessed with Crayola. What can I say? We Love Art!!
Subscribe to:
Posts (Atom)