
Friday, October 29, 2010
Apron # 2
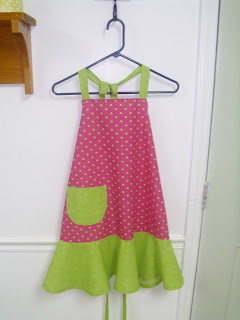
Here is the finished second apron. I am still going to add a little trim and some bows, but I think it turned out pretty cute! A nice, simple start to my sewing adventures!
Monday, October 25, 2010
Apron!!
The other day at WalMart (the one in York still sells fabric), my Mom and saw an adorable Christmas apron on display, and we discovered that it was from an easy-to-sew, pre-printed pattern. That means that the pattern was printed directly on the fabric, like this:


It even came with instructions printed on the fabric:

I have been coveting those super cute, frilly aprons that are popular --and expensive -- right now (I love this website), so I decided to take the opportunity to make a second apron at the same time. All in all I think I spent about $10 for both aprons. I picked some cute pink and green fabric, laid the Christmas pattern on top of it, and cut them both out at the same time so I ended up with two of everything:


Then I just followed the instructions on the pattern and got it all sewed together. Now, I do not have much experience with a sewing machine, so my Mom gave me lots of help and instruction! It was a bit of a slow process (everything had to be pressed, hemmed, pinned, etc), but the finished product turned out really cute! I have not finished the pink one yet, but I will post pictures of it as soon as I get it done.

Paper Pumpkins
Ok, here's an activity Evan and I did the other day. It was super easy, and turned out really cute! Here's the link where I got the idea. I didn't really get any "in the process pictures," but I think you can get the idea from the finished product.
 All we used was orange and green paper, glass jars (we used short left-over jars from spinach dip, but any sort of jar or glass you have will work), and tape. Since my jars were a little sticky from removing labels and I didn't really want to spend lots of time trying to get the sticky stuff off, I just wrapped a strip of black construction paper around the jars before I started. Then we cut the orange paper into strips -- long strips if your jar is taller, short strips if your jar is shorter. Just make sure that the paper is an inch or two longer than the height of the jar. To make the jack-o-lantern we drew the face on before we cut out the strips. Then all we did was tape the paper to the top and bottom of the jar. I overlapped the strips a little so that there wouldn't be any big gaps. I added some green leaves and a curled vine to the second one for a little color, dropped in a candle, and they were done! Cute, huh?


Tuesday, October 19, 2010
Milk and Cookies Party


Sunday, October 10, 2010
Hurricane Lamps
The other day my cousin sent me some links for some really cute craft projects, one of which was these beautiful hurricane lamps. The website, MyBlessedLife.net, has some great ideas, and I decided to try these lamps. As we all probably know, a good hurricane lamp can be pretty pricey. So, why not make our own? The lady who originally did this used vases she had around the house and then got assorted candle sticks from the Dollar Tree. I didn't have any vases big enough, so I got vases and candle sticks from the dollar store. I just made two to start with, and here's what I did (Thanks, myblessedlife.net):
I started with my two vases and two sticks, washed, dried and ready to go. I chose two different sizes of vases, just for variety. (Please ignore all the extra stuff in the background...)


I started with my two vases and two sticks, washed, dried and ready to go. I chose two different sizes of vases, just for variety. (Please ignore all the extra stuff in the background...)

I used Gorilla Glue, which was easier to use than I thought it would be after reading the other blog. I found it at Michael's right with all of the other adhesives. You lightly dampen one of the surfaces, then apply a thin layer of glue to the other. I repeat, a thin layer of glue. The glue bubbles and expands as it dries, so a little goes a long way. After adhering the candle sticks to the vases, I weighted them with books and let them dry...

Once they dried (which takes about an hour) I turned them over.....

and filled them with things I had on hand. I think I would like the larger one better with a larger candle, but here's what I ended up with.

Fall Wreath
OK. I made what is (in my humble opinion) the cutest fall wreath ever! For less than $10. :) OK, here's what I did. I got some ideas and inspiration for some cute wreaths and centerpieces on the Better Homes and Gardens website, then I got to work. I found a plain wreath and some fall leaf garland on clearance at Michael's, I used bits of some potpourri that I've had for several years, and Evan and I collected pine cones from my parents' yard.


I first went through and just popped some of the leaves off of the garland and started laying out a rough-draft arrangement of how I wanted it to go. I decided to only use the smaller bits of the potpourri so that the colored leaves could be the main focus. I wasn't sure whether I would use the pine cones or not, but after I had it all laid out I decided that they would look very nice as a focal point at the bottom of the wreath.


I used hot glue to attach all the pieces. For the leaves I found it easier to put the glue on the wreath and then stick the stems of the leaves to it, but for the potpourri pieces it was easier to generously put the glue directly on the potpourri, then stick it to the wreath. And here is the finished product!

Not really a craft, but oh-so-yummy!
Ok, as the title states, this post is not about a craft, but about some yuuummmmyyyy soup I made the other day when it was so chilly and rainy. Here's what it looks like, then I'll post the recipe..

 Here's the basic recipe, then I'll add some of the changes I have made:
2 stalks celery, thinly sliced
1 cup diced red pepper
2 cups fresh white small mushrooms, cut in half
4 tbs butter
2 tbs all-purpose flour
2 cups chicken broth
2 cups peeled/diced russet potatoes
1 medium yellow onion, chopped
2 1/2 cups whole milk
3 slices bacon, crisp and crumbled
1 cup petite frozen sweet peas
2 cups fresh or frozen corn
salt and pepper to taste
In saucepan cook celery, onion, red pepper, mushrooms in hot butter over medium heat about 5 minutes or until tender. Stir in flour until combined. Stir in broth, bring to boil, stirring constantly. Add potatoes, return to boiling. Reduce heat; simmer uncovered about 15 minutes or until potatoes are tender. Stir in milk, bacon, peas and corn. Heat thoroughly. If you like thinner soup, add additional milk. Season with salt and pepper to taste.
Now here's how I change it:
As far as veggies go, I basically use whatever I have on hand. In addition to the ones mentioned above, I also sometimes used green bell pepper, carrots (chopped finely so they will sauté quickly), broccoli, and zucchini. Adjust the amount of butter you use for sauteing according to how many veggies you have. There needs to be enough butter to mix with the flour to make a thick broth. Once the veggies and potatoes are done, it is also very tasty to add fresh parsley and chives (or use as garnish), and this soup is very good with chicken! I like my bacon to stay crunchy, so I also use it as a garnish (not pictured). An interesting variation is to use creamed corn instead of fresh or frozen--it gives it a nice, thick, sweet finish. Top with cheese and you have quite a tasty (and filling) soup!
o
Subscribe to:
Posts (Atom)