 |
| They are both double-sided--red on one side, blue on the other. Ignore the lack or ironing! |
Tuesday, November 29, 2011
Playing Santa's Elf
So several weeks ago I had the idea to make super hero capes for the boys for Christmas. I happened to find some nice cute and red fabric at JoAnn's the other day, so I thought I would give it a try. These capes were SO easy! Here is the tutorial I followed, courtesy of How Does She?. It was seriously super easy to follow. The only thing I have left to do is add the hero logos. Any suggestions on how best to do that are welcome! :)
And again... these are Christmas presents, so shhhhh! Don't mention it to Evan! ;)
I made a dress for my baby!
Hooray! I finally got to make something for my little-one-to-be! I made it without a pattern, thought I did get some inspiration from several blogs (and Pinterest). I made it using a onesie and a scrap of cute little pink flowered fabric. Now. The band around the waist is not straight and I am aware of it. I took the seam out and sewed it again, and it is still crooked. Also, I am going to cover the stitching around the band with some ribbon or something, That being said, I think it's not too bad for a first try at making something completely on my own!
A lot of onesie dresses cut off the bottom part of the onesie, but I left mine whole so that I could still snap it around her diaper. That way it won't ride up when she wiggling around or we pick her up. I just hemmed a rectangle of fabric, gathered it, sewed the side edges together, then sewed the skirt onto the onesie. Then I sewed a purple tube of fabric and sewed it right over top of the ruffle (mostly to hide the raw edge of the ruffle). I thought about doing a whole tutorial, but didn't know if anyone would be interested. If you want more detail, let me know. :)
 |
| Please ignore the dingy onesie. This was a trial run with one of the boys' old onesies! |
A lot of onesie dresses cut off the bottom part of the onesie, but I left mine whole so that I could still snap it around her diaper. That way it won't ride up when she wiggling around or we pick her up. I just hemmed a rectangle of fabric, gathered it, sewed the side edges together, then sewed the skirt onto the onesie. Then I sewed a purple tube of fabric and sewed it right over top of the ruffle (mostly to hide the raw edge of the ruffle). I thought about doing a whole tutorial, but didn't know if anyone would be interested. If you want more detail, let me know. :)
Tuesday, November 1, 2011
Reusable "zip-lock" bags
So I've seen several different versions of these around, but most of what I've seen has sounded pretty complicated (sewing vinyl to the inside, etc), but this woman on the I Can Teach My Child blog is brilliant. She guest-posted (is that a word??) this tutorial on Oopsie Dasie, and it is fabulous. She used a vinyl tablecloth to make her baggies. You know, the kind you use on a picnic table that has soft cotton on the back? The tutorial is very easy to follow, and the tablecloth only cost me about $3. No more wasting money on plastic bags for me!

My first bag took about 45 minutes, mostly because I had to keep stopping and starting. (The second one only took 20 minutes!) I would suggest using a more heavy-duty needle than you would normally use, and be prepared to sew more slowly. The vinyl gets very thick towards the end and I nearly broke my size 14 needle. A 16 worked just fine.
The second one I made a little bit wider (I believe her tutorial says to make it 7.5" wide, but I went up to 8" for the second one.) It only took about 20 minutes to make start-to-finish. These really are very simple!

These are the perfect size for snacks and (hopefully) sandwiches, they are washable, and they are somewhat insulated with all the felt on the back of the table cloth. Plus, the bags only used about 1/100th of the oblong tablecloth (Ok, I just made that percentage up), so I could make a ton of these bags and still have enough table cloth left to make some bibs. Hmmm... tomorrow's project??

My first bag took about 45 minutes, mostly because I had to keep stopping and starting. (The second one only took 20 minutes!) I would suggest using a more heavy-duty needle than you would normally use, and be prepared to sew more slowly. The vinyl gets very thick towards the end and I nearly broke my size 14 needle. A 16 worked just fine.
 |
| In her last step she has you put the velcro together and stitch up the sides, so that the stitching is on the outside. I did mine with the stitching on the inside. Just fold the bag in half with the Velcro on the outside, sew up the sides, then turn it right-side-out. .....it'll make more sense when you read her instructions. |

 |
| See the difference in the width? |
Christmas presents.. shhh!
So I have started making Christmas presents--yay! I will post one or two depending on who they're for. If we have your kid's name and you want to be surprised, let me know and I won't post! This first one is a scripture tote made from a place mat. I got just a neutral-colored mat that cost about $2 at WM. I read several tutorials to get the basic idea of how to do it, then I just sort of worked it out. Here are a couple of the in-process pics, then the finished result.
 |
| Supplies: place mat, ribbon, sewing supplies |
 |
| Step one: sew on handles. (This was my first ever handle, so excuse the un-even box!). Measure in from the sides to get them evenly spaced |
 |
| Pin and sew down any ribbon, lace, fabric or embellishment you want. (It will cover the stitches from the handles) |
 |
| Now put the right sides together and sew up the sides. |
 |
| Flatten out each corner into a triangle and sew straight across. I followed tutorials and sewed it at two inches, but might do it at about 1 1/2 inches next time. 2" made a very wide bag. |
 |
| Trim corners, turn right-side-out and add a bow or flower or whatever you want! |
 |
| Ta-Da! |
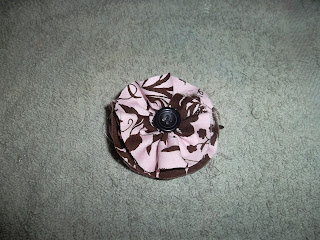
Hey, I made this!
I made this a while back, and I just forgot to post it. Here is the tutorial I used. It only took about 20 minutes. After I got it all wrapped and sewn together, I trimmed the top layer a little so it would give it more of a layered look. I think it turned out pretty cute. Next time I'll make it smaller though. :)

Monday, October 24, 2011
Blocks, phase two
So here is part two of my "multi-purpose" blocks. I guess I could call them multi-functional? Anyway, I followed the exact same process as the FALL blocks, even printing holiday paper from the same blog. When I actually set them out for Christmas, I will embellish them with garland/ribbons, etc., and I'm not 100% sure that I'm sold on my paper choices, but for now here is how they turned out:

Now, there will be a phase 3 of this project. In the next couple of weeks, I will be decorating the backs of the blocks to spell the word THANKS, so that I will have three sets of blocks in one: Fall, Joy and Thanks. :) Coming soon!

Now, there will be a phase 3 of this project. In the next couple of weeks, I will be decorating the backs of the blocks to spell the word THANKS, so that I will have three sets of blocks in one: Fall, Joy and Thanks. :) Coming soon!
Monday, September 26, 2011
Multi-purpose Blocks
Here is my fall craft #2, multi-purpose blocks:

Step 3: While the paint dries, cut out rectangles of the scrapbook paper to cover as much or as little of the block as you want. I wanted to show a little of the white, so I cut the paper slightly smaller than my blocks.
Step 5: Cut out letters and adhere them to the blocks. I used my Cricut to cut vinyl, but any die-cut letters would work. They could be decoupaged on if need be. Again, I like uniformity, so mine are all of the same font and somewhat in a straight line. Feel free to adlib. :)

And I actually have step-by-step pictures to go along. I'm pretty proud of myself. :) Now, they don't look multi-purpose here, but that's because I am only done with phase one of the process. The rest will be explained at the end! (And I must give credit. The real inspiration for this is found here, but I only ever looked at the pic on Pinterest. I never actually went to the blog for instructions, I just made it up as I went along.)
To make blocks you need:
wood blocks, acrylic paint and brush, scrapbook paper of desired pattern, Mod Podge, die-cut letters (from paper or vinyl)
Step 1: Have your super-awesome sister cut random blocks out of scraps of 2x4. Or anyone else you know who has a saw. They can be any size and shape, but I happen to like uniformity and symmetry, so I cut 3 short, 3 medium, and 1 tall block. (Why so many? Read on....)
Step 2: Paint them. I chose white because I wanted a neutral color that would fit with different seasons, but any color is fine, depending on what you like.
 |
| See how nice and neat?? |
 |
| This cute paper actually came from this awesome website, and I printed it myself. They have tons of printables! |
Step 4: When the paint is completely dry, decoupage the paper onto the block. I used a very thin layer of Mod Podge since my paper was so thin.
 |
| The Mod Podge actually seemed to deepen the colors for me, which I like. |
 |
| Ignore the clutter and random children's toys in the background... |
Step 6: Add a bow if you want, or any other embellishments that you can think of, and enjoy. I first tried them out on my mantle (as in the picture at the top), but with everything else up there it was too crowded and they didn't stand out enough. So I moved them here:
 |
| Nice pop of color, right? |
With the other three blocks I plan to follow a similar patter to spell out the word "Joy" for Christmas (my favorite Christmas word), and on the back of six of the blocks I am going to spell out the word "Thanks." That way I have a set for fall, a set for Thanksgiving, and a set for Christmas, all in one set. Make sense??
I Love Fall!
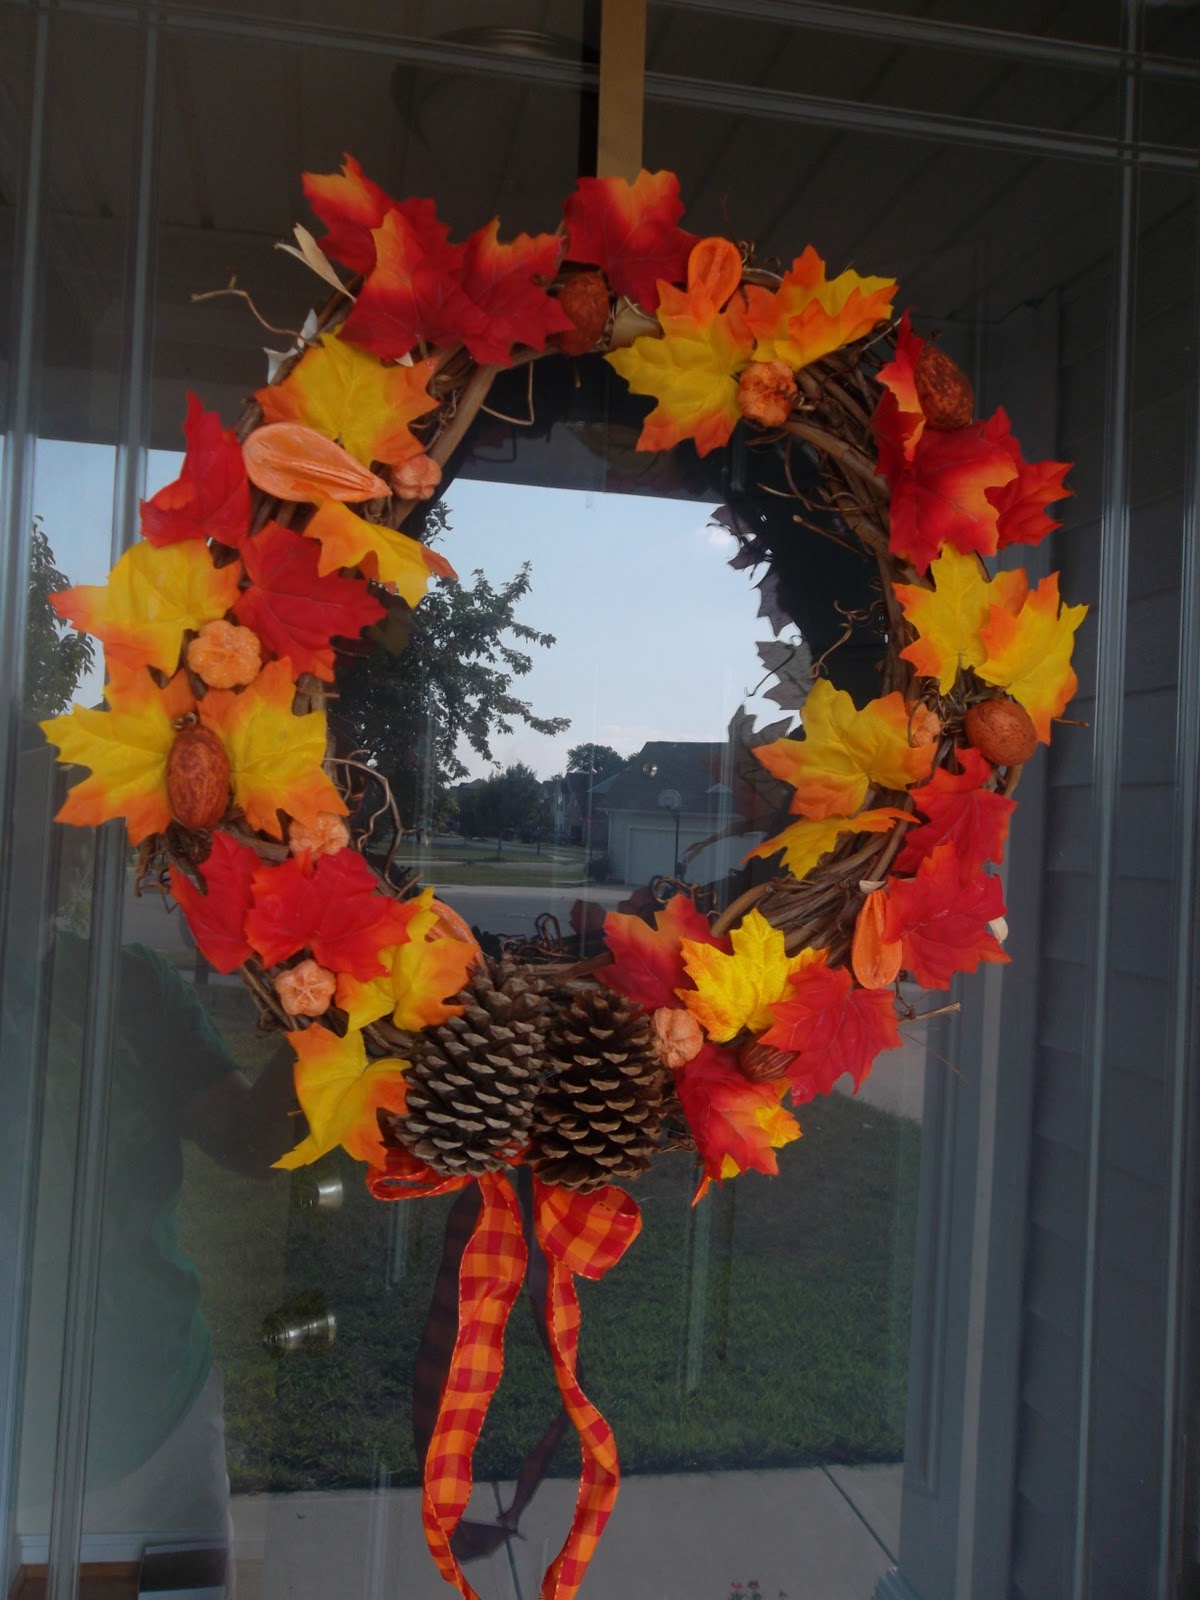
I am so in love with fall! I love the weather, the colors, the fall holidays... everything! So over the past couple of weeks I have been getting ready for fall with some crafts. This wreath I actually made last year, but I love it so much I thought I'd post again! In total I think it probably cost me about $10, if that. The wreath and the garland leaves were on sale at Michael's for pretty cheap. I don't have pics to do a step-by-step "here's how I did it," but it was very easy. I took the leaves off of a garland (literally, I popped them off), took pine cones from my Mom's yard, ribbon from my left-over scrap box, and the potpourri from a storage box. Then I got out my hot glue gun and got busy. I love the colors!

This next one was even easier. I got a couple of bushes of fall flowers on sale at Michael's (they had their big fall sale last week....can you tell???), grabbed a cornucopia basket that someone gave me, put the flowers in, and hung it with wire. Ok, so I didn't actually have wire. That is a straightened coat hanger.


This next one was even easier. I got a couple of bushes of fall flowers on sale at Michael's (they had their big fall sale last week....can you tell???), grabbed a cornucopia basket that someone gave me, put the flowers in, and hung it with wire. Ok, so I didn't actually have wire. That is a straightened coat hanger.

And here is how the two look together on my front porch:

Tuesday, September 13, 2011
I want to make these..
These are so cute... Thanks Shabby In Suburbia! They look just like the ones that take 3 days to make with resin (on the Hobby Lobby Inspirations page), but they're made with glass tiles and scrapbooking paper. Easy! (The link is for the tutorial.)


Tuesday, August 16, 2011
I heart Hobby Lobby
I found a new reason to love Hobby Lobby. Their Porject Inspiration pages! They have "Inspirational Sets" which basically just show you a bunch of ideas using one of their products, but they are very cute ideas! My favorite, though, are their "Project Sheets." Everything on there comes in PDF format (it basically looks like they scanned in their free pamphlets) that can easily be printed, and these Project Sheets are actually instructions to the crafts! I want to make one of these, these (at Christmas time) and some of these (much cuter than the ones I made the other day)!
(And here's a pic, just to spark your intereste!)

(And here's a pic, just to spark your intereste!)
I made a Tie!
So, I have been searching and searching for a necktie for Evan to wear to church. We had one that we got from the church bookstore, but it quickly got torn up and untied. The ones at the department stores are expensive and either too long or too short. So I started looking for patterns. I found some fabric months ago in the discount bin at Hobby Lobby (I think it was about $3 for almost a yard) that I had been dying to make a tie out of, but I was not willing to pay $15 for a pattern. That's almost the same as just buying a tie. So the other day (again, after I finally got my craft area clean) I searched online for a pattern and tutorial that looked do-able. I found this post on The Purl Bee blog (which is fabulous!) and thought it looked easy and fast, and it was! I think I worked on this for 4 hours total (including trying to teach myself how to do a slip stitch and then doing it veeeeeeerrrrrry slowly and stopping to check the blog every 5 minutes to make sure I was doing the right thing), start-to-finish. I want to try another one for Christian (which you can do by reducing the size when you print it apparently...duh!), and I'm sure it will go much faster now that I know what I'm doing. It was really fun, and I love the result!
 |
| Wasn't sure how to tie it... |
 |
| My little model... in full Batman attire, naturally |
 |
| I looked up how to tie it real quick, but I'm not very good! :) |
A New Project!
So I FINALLY have my craft area re-organized, and I love going into the room now. It has totally renewed my crafting spirit! Now, I don't have a lot of funds right now (my piano lessons haven't started back up yet), so I'm mostly crafting with just what I have laying around. Here's what I did the other day: votive holders!

It's not the most magnificent thing I've ever made, but I think they're pretty cute. I used some empty cheese dip jars (my hubby's favorite), took off the labels, and Mod Podge'd on tissue paper. I wanted to try a couple of different things for embellishments, so I wrapped a scrap of lace around one and a simple ribbon around the other. I think the music one will look cute on my piano. :) I like the blue ribbon on the lace--it gives it a more casual accent (as opposed to, say, pearls, which I also considered putting on), and gives it a little extra color. It only took m about an hour to make both, including mod podge drying time, and there are sooooo many things you could put on them! I just used what I had on hand, but you could do different papers, ribbons, charms, jewels...even feathers and paint! I can't wait to get more supplies so I can try different things!

It's not the most magnificent thing I've ever made, but I think they're pretty cute. I used some empty cheese dip jars (my hubby's favorite), took off the labels, and Mod Podge'd on tissue paper. I wanted to try a couple of different things for embellishments, so I wrapped a scrap of lace around one and a simple ribbon around the other. I think the music one will look cute on my piano. :) I like the blue ribbon on the lace--it gives it a more casual accent (as opposed to, say, pearls, which I also considered putting on), and gives it a little extra color. It only took m about an hour to make both, including mod podge drying time, and there are sooooo many things you could put on them! I just used what I had on hand, but you could do different papers, ribbons, charms, jewels...even feathers and paint! I can't wait to get more supplies so I can try different things!
Tuesday, May 10, 2011
Mother's Day Gifts
Here are a couple of projects Evan helped me work on for his grandmothers for Mother's Day. For my mom he helped me paint a birdhouse that he picked out from Michael's. He is quite the good painter. :) When the paint was dry I cut the shapes out on my Cricut and decoupage'd them on to the sides of the birdhoue. Here's what we got...


Next we made letters for Evan's other grandmother, whom he calls MiMi. The letters we found at Michael's came with a base that held up to 4 letters, so it worked out perfectly! I wish I had had matching purple paint to paint the base, but I still think it turned out pretty cute. We traced the letters onto paper, cut out the shapes, Mod Podge'd them on, then cut out long strips to wrap around the outside and inside edges. Super easy! Gotta love Mod Podge!


Next we made letters for Evan's other grandmother, whom he calls MiMi. The letters we found at Michael's came with a base that held up to 4 letters, so it worked out perfectly! I wish I had had matching purple paint to paint the base, but I still think it turned out pretty cute. We traced the letters onto paper, cut out the shapes, Mod Podge'd them on, then cut out long strips to wrap around the outside and inside edges. Super easy! Gotta love Mod Podge!

Saturday, May 7, 2011
Mod Podge
I think I'm addicted to decoupage. Here is my latest project. It's just a wooden serving tray from Michael's, and I painted it white and Mod Podge'd cute paper onto the tray part. Very easy, very fast, and cute! It could be done in sooooo many different ways, with any colors or paper. Love it!


Tuesday, April 26, 2011
Hair Bows!
So this past week my sister and Mom and I got together several times for big craft days. We did everything from scrapbooking to sewing to bow-making. This was the first time I have ever made bows. Since I have boys, I haven't really had a need. But having all 5 of my nieces around inspired me! So, here is the collection of bows that I made. :) Some are the twisted rosettes, some are just the folded little bows, and some have giant flowers! All of them are glued onto alligator clips wrapped in coordinating ribbon.


Saturday, April 9, 2011
What I've Been Up To Lately
Here is a peak into what I've been working on lately. I had a baby shower coming up and saw this cute idea over at Living Craftily Ever After and knew I had to make one. I have future plans to make one for Addison as well. Aren't they adorable?!
 Also, for the aforementioned baby shower, I decided to make some wall letters. Here is how they turned out. I used chipboard letters from Hobby Lobby (which were $0.99 on sale), scrapbook paper, and Mod Podge. Super easy, and I think they turned out pretty cute.
 Last but not least, I decided to make a tag blanket. I didn't have any minky fabric on hand, but I did use a soft flannel.The birdie fabric is so cute! I think I purchased it from Hancock Fabrics last year. Oh, and see the little iron-on initial? I wanted to make a bit more personal, and it was obviously super easy to apply. All you need is an iron.
 Addison was invited to her first birthday party today. I've been inspired to use my Cricut more and more lately and was able give this bucket from Target (in the dollar section, which cost $2.50...hmmm not really a dollar) a spruce with some vinyl love. Functional and cute. My favorite combination.
 Here's a peak at the back.
 I'm tempted to make one for Little A with polka dots. Actually, I think I will. We can always use cute and functional storage buckets. Right?


Love this Blog!
http://www.dana-made-it.com/
I have posted links to this blog before, but I just LOVE it! They have so many cute ideas, especially for little boys! I am going to make these just as soon as I can get to a fabric store. They are the cutest little felt pirate vests, hats, eye patches, and you don't even have to sew them! The vests can be adapted to work for pirates, cowboys/girls, or anything else you can come up with. I showed them to Evan and he is super excited too! I'll post when I get them done! :)
I have posted links to this blog before, but I just LOVE it! They have so many cute ideas, especially for little boys! I am going to make these just as soon as I can get to a fabric store. They are the cutest little felt pirate vests, hats, eye patches, and you don't even have to sew them! The vests can be adapted to work for pirates, cowboys/girls, or anything else you can come up with. I showed them to Evan and he is super excited too! I'll post when I get them done! :)
Sunday, April 3, 2011
Conference Buckets
As Conference was approaching this year, I was trying to think of ideas to keep Evan's attention during conference. None of the "conference notebooks" or packets seemed to be geared towards Sunbeams (they all required reading and writing), so I was really glad when Melissa sent me this link. Conference treat buckets! What a brilliant idea! Igot little flower pots at 2/$1 from the dollar section of Target. Since I don't like filling my children with straight-up candy though, we decided to put different treats in some of them. We ended up Raisinets, Reese's Pieces, candy corn, popcorn, cheese crackers, and Goldfish. Instead of just printing the words on the buckets, I also went to ldsclipart.com and printed little pictures of each word and glued them on. Evan LOVED it! He payed a lot of attention for a 3-yr-old, and he got quite a lot of treats. Looking forward to seeing how well he keeps it up today!


Monday, March 28, 2011
Curtains, finally!
Ok, I finally finished Evan's curtains! It took a LOT of trial and error, but I am pretty pleased with the finished product. My camera has been broken since Thanksgiving, so I did not get many pictures taken of the actually sewing process, but here's the picture of the end product.
 Ok, so here's what I did: The fabric that I found made this really easy. The pattern was in nice long rows, with enough space in between each row that I was able to cut it into strips right between the pictures and still have a bit of room for a hem. Then I just ironed under the edges and the ends, spaced and pinned down the strips of fabric, and sewed them on. I had to sew very close to the edge of the fabric, so it was hard to keep my lines straight, but I have a hard time keeping straight lines anyway! Now that I've done it, figured it all out on my own, and can look at it in retrospct, it was really quite simple. Maybe I won't be so scared to try something else like this!

Subscribe to:
Posts (Atom)